

Winning at backgammon comes down to one thing: moving all 15 of your checkers around the board and off again before your opponent does the same. It’s a race, pure and simple. You'll roll dice to see how far you can move, but the real art is in choosing which pieces to advance while you try to trip up your opponent.
Once you get a feel for these fundamentals, you'll be more than ready to play your first game.
Your First Look at the Backgammon Board
Welcome to the world of backgammon! It's one of the oldest games on the planet, but don't let its age fool you—it's an incredibly engaging mix of skill and luck. Before you can dive into strategy, you first need to get acquainted with the tools of the trade. Knowing what each piece does is the first step on the path to becoming a skilled player.
The board itself is made up of 24 long triangles, which we call points. These points are your stepping stones. They're arranged into four groups of six, known as quadrants. From your perspective, you have a home board and an outer board, and your opponent has their own right across from you.
The Key Components
Your goal is to guide your 15 checkers from their starting layout, counter-clockwise around the board, and into your home board. Once they're all home, you can start removing them from the game. This final phase is called "bearing off," and it's how you seal your victory.
Let's break down the individual pieces you'll be working with:
- Checkers: You get 15 of them, and so does your opponent. One set is light, the other is dark. Think of them as your army.
- Dice: You'll have a pair of standard, six-sided dice. Each roll tells you how many points, or "pips," you can move. You can use the roll to move one checker twice or split it between two different checkers.
- Doubling Cube: This is a special, oversized die marked with 2, 4, 8, 16, 32, and 64. It’s used for raising the stakes of the game. For now, you can just set it to the side—it's best to learn the flow of movement first.
Backgammon is a beautiful dance between strategy and chance. The dice roll introduces unpredictability, but your choices ultimately steer the game. Experienced players consistently win around 60-70% of their matches, which shows just how much your decisions matter.
With a history stretching back nearly 5,000 years, it’s a game that has truly stood the test of time. But despite its depth, the rules are straightforward enough for anyone to learn. Modern players are always looking for ways to balance these elements of skill and luck.
Backgammon Components and Their Purpose
To help you get comfortable with the setup, here’s a quick reference table. It breaks down the main components and what they're for. Think of it as your cheat sheet for understanding the battlefield.
| Component | Quantity | Primary Function |
|---|---|---|
| The Board | 1 | Contains the 24 points where checkers move. |
| Checkers | 15 per player | Your game pieces, moved according to dice rolls. |
| Dice | 2 per player | Determine the number of points you can move. |
| Doubling Cube | 1 | Used to increase the value of the game. |
| The Bar | 1 (center strip) | The area where "hit" checkers are placed. |
Once you have these pieces identified, you’re ready to learn how to set them up for the start of a game.
How to Set Up the Board for Your First Game
Before a single die is cast, a game of backgammon hinges on getting the setup right. Each player has 15 checkers to arrange in a specific starting formation. This isn't just a matter of procedure; this initial placement defines the entire strategic landscape of the opening game.
First, lay out your board. You’ll immediately see a ridge running down the middle—this is called the bar. The board features 24 triangular points, and while they aren't usually numbered on the board itself, understanding their layout is crucial. Just remember that you and your opponent move your checkers in opposite directions, racing toward your respective home boards.
Understanding the Board's Geography
Think of the board as four distinct quadrants. Your home board is made up of points 1 through 6, and your outer board contains points 7 through 12. Directly across from you lie your opponent's territories: their outer board (what you'd call points 13-18) and their home board (your points 19-24). The entire game is a race to get all 15 of your checkers around the board and into your home board.
The standard setup is perfectly symmetrical, creating a balanced and fair start. If you're playing with the darker checkers, here’s precisely where they go. It might feel a little complicated at first, but after a few games, it’ll become pure muscle memory.
Here’s the breakdown for your 15 checkers:
- Place two checkers on your 24-point. This is the point deepest in your opponent's home board.
- Stack five checkers on your 13-point, located in your opponent's outer board.
- Put three checkers on your 8-point, which is in your own outer board.
- Finally, place five checkers on your 6-point, right inside your home board.
Your opponent does the exact same thing, creating a perfect mirror image with their checkers. This symmetrical starting line ensures neither player has an immediate advantage, setting the stage for a battle of skill and luck.
The initial setup isn’t just about placing pieces; it’s about positioning your forces. Those two checkers on the 24-point are your "runners," deep in enemy territory. Meanwhile, the five checkers on your 6-point act as a defensive wall, protecting your home.
This diagram shows the standard starting position at a glance, helping you visualize the layout.
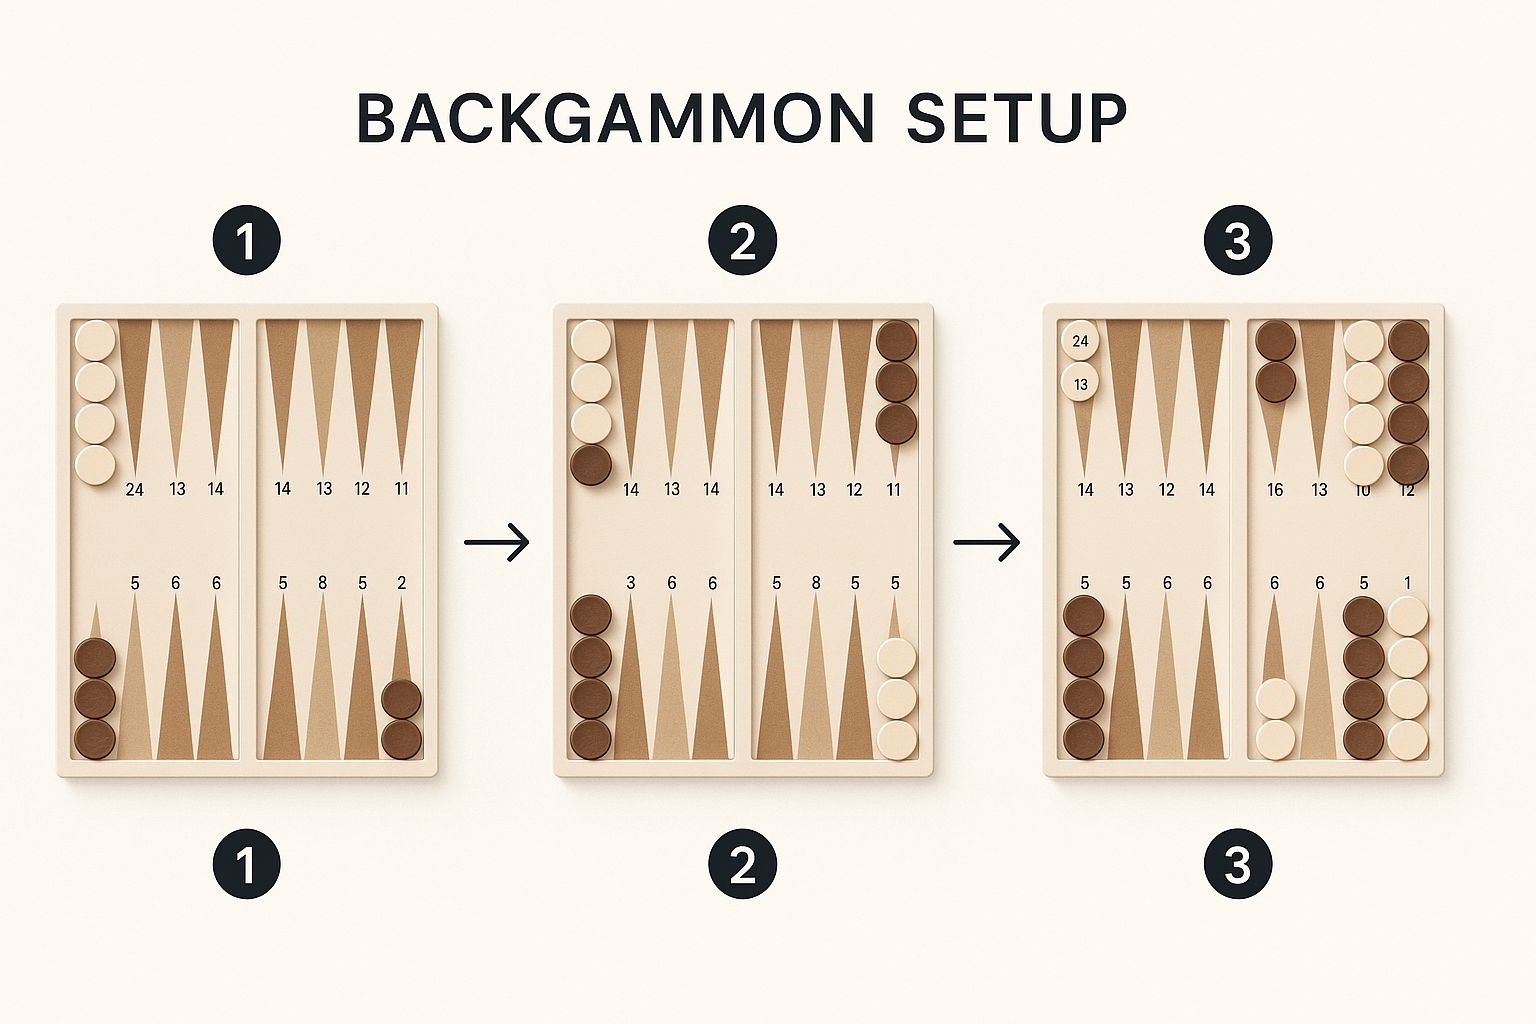
As you can see, the checkers are distributed across all four quadrants, establishing the balanced conflict that every great game of backgammon starts with.
Setting Up for Success
With the checkers properly placed, you're officially ready to begin. The board is now ripe with tactical challenges right from the start. Your rearmost checkers on the 24-point are quite vulnerable, so a key early goal is to guide them toward safety while simultaneously trying to build defensive walls, or primes, to impede your opponent.
Learning this setup is the first real step toward mastering the game. It prevents any early confusion and ensures the rules can be applied fairly from the opening roll. Of course, a great set can make the experience even more enjoyable. If you’re considering an upgrade, you might want to look into a marble backgammon set to add a touch of class to your games.
After you've set up the board a handful of times, the positions will feel completely natural. This is when the fun really begins, as your focus shifts from simple placement to the rich, dynamic strategy of the game itself. Now, you’re ready for that opening roll.
Making Your Moves: The Core Gameplay Rules
With your board set up, you're ready for the real action. Backgammon’s heart lies in how you move your checkers based on each dice roll. Every turn is a small puzzle, and the choices you make will pave your way to victory. Let's break down the essential rules of movement, hitting, and re-entering—the mechanics that form the very backbone of every game.

Reading the Dice and Moving Your Checkers
Your turn begins with a roll of both dice. The numbers that come up dictate how many points, or "pips," you can move your checkers. Say you roll a 4 and a 2. This gives you two distinct moves: one of four points and another of two.
You can play this roll in a couple of ways:
- Move a single checker twice: Advance one checker four points to a new spot, then move that same checker an additional two points to its final destination.
- Move two different checkers: Move one checker four points and a completely separate checker two points.
It's absolutely critical to remember that you must use both numbers from your roll if you have a legal move. If you can only legally play one of the numbers, you have to play the higher one. If neither number allows for a legal move, you unfortunately forfeit your turn.
The Power of Rolling Doubles
Rolling doubles—the same number on both dice—is a game-changer. When this happens, you get to play each die twice. For instance, rolling double 5s gives you four separate moves of five points each. This is a massive advantage, allowing you to quickly advance your checkers, build up strong defensive points, or escape a tricky spot.
Learning the board layout is the first hurdle for any beginner. The board has 24 points sectioned into four quadrants, and each of the two players starts with 15 checkers. Your dice rolls are your engine for moving across these points. The probability of rolling doubles is about 1 in 6 (roughly 16.67%), so when it happens, you get a powerful burst of movement that can really shift the game's momentum.
A fundamental rule is that your checkers can only land on open points—those not occupied by two or more of your opponent's checkers. This forces you to think tactically from the very first roll. Also crucial is the 'bar,' the middle divider where hit checkers are placed. A player must re-enter any checkers from the bar before they can move any others on the board.
Landing on Open and Closed Points
You can't just move your checkers anywhere you please. A point is considered open if it’s either empty or occupied by only one of your opponent's checkers. These are your legal landing spots.
On the other hand, a point is closed or blocked if your opponent has two or more checkers on it. You can never land on a closed point—not even as a temporary stop during a longer move. This concept is the very foundation of defensive strategy in backgammon.
Key Takeaway: A point with two or more of your opponent's checkers is a solid wall. A point with only one is a vulnerability waiting to be exploited.
This simple rule is what gives the game its deep strategic layers. By placing two of your own checkers on a point, you "make" that point, creating both a safe haven for your checkers and a barrier for your opponent.
Hitting and Entering from the Bar
Now we get to the fun part—direct interaction. If you land on a point that is occupied by a single opposing checker (known as a blot), you "hit" it. Hitting sends that checker off the board and onto the central divider, the bar.
This is a major setback for your opponent. Before they can make any other moves, they must use their next turn to bring that hit checker back into the game from the bar.
To re-enter, your opponent rolls the dice and uses the numbers to move their checker onto an open point in your home board.
- A roll of 1 lets them enter on your 1-point.
- A roll of 2 lets them enter on your 2-point.
- ...and so on, up to a 6 for the 6-point.
But what if all the potential entry points are closed by your checkers? In that case, your opponent is stuck. They cannot re-enter, forfeit their entire turn, and must try again on their next roll. This can be devastating, trapping them on the bar while you freely advance your own position.
For a deeper look into the official rules, you can explore these detailed backgammon game instructions. Getting these core mechanics down is your first real step toward playing a confident and strategic game.
How to Win by Bearing Off Your Checkers
The endgame in backgammon is where the real excitement builds—it’s a nail-biting race to the finish line. This final stage is called bearing off, and it's where you physically remove your checkers from the board to claim your victory. Everything you've done up to this point has led here, but this phase has its own unique rules and tactics that you absolutely must master.
Before you can even think about removing a single checker, there's one critical prerequisite: all 15 of your checkers must be safely inside your home board. Your home board is the last quadrant your checkers travel through, made up of the final six points. Until every last piece is in this safe harbor, the bearing off process can’t start.
The Rules of Bearing Off
Once all your checkers are home, the game transforms. Your dice rolls now have a new, powerful purpose. Instead of just moving checkers along the points, you'll use the numbers you roll to take them right off the board.
For instance, a roll of 5-2 gives you a clear instruction: you can remove one checker from your 5-point and another from your 2-point. The number on each die corresponds directly to the point from which you can bear off.
But you don't always have to bear off. If you can make a legal move within your home board, that option is still on the table. This can be a smart, strategic decision, especially if you need to reposition checkers or, crucially, avoid leaving a lone checker vulnerable if your opponent is still lurking.
Handling Specific Dice Rolls
So, what happens when you roll a number for a point where you don't have any checkers? The rules have a simple, elegant solution for this. If you roll a number that’s higher than your highest occupied point, you must bear off a checker from that highest point.
Let's walk through a common scenario to see how this plays out:
- You have checkers remaining only on your 4-point, 2-point, and 1-point.
- Your 6-point, 5-point, and 3-point are all empty.
- You roll a 6-3.
In this situation, you have no checker on the 6-point to remove. So, the rules dictate you use the '6' to bear off a checker from your highest occupied point—in this case, the 4-point. For the '3', you have no checker on the 3-point to remove, so you must use it to make a legal move, which would likely mean moving a checker from the 4-point down to the 1-point.
A Word of Caution: The goal is to get your checkers off the board as quickly as you can, but safety always comes first. If your opponent still has a checker in your home board (what we call an 'anchor'), bearing off becomes a high-stakes affair. Leaving a single checker (a 'blot') on a point is an open invitation to get hit, which sends that piece all the way back to the bar and can snatch defeat from the jaws of victory.
This leads to a crucial strategic question: when do you go all-in and bear off aggressively, and when do you play it safe? The answer hinges entirely on your opponent's position. If they're out of the picture with no way to hit you, it's a pure race. Get your checkers off as fast as humanly possible.
Strategic Considerations in the Endgame
If your opponent has an anchor, the whole dynamic shifts. Every roll demands careful consideration. It can often be smarter to use a roll to move a checker from a higher point to a lower one, even if you had the option to bear it off. This helps you consolidate your checkers on the lowest points, which cleverly minimizes "wasted" pips on high rolls later on.
This table gives a clearer sense of the choices you'll face:
| Your Roll | Your Board State | Recommended Action |
|---|---|---|
| 5-2 | Checkers on the 5 and 2-points | Bear off one checker from the 5-point and one from the 2-point. (The straightforward play.) |
| 6-1 | No checkers on the 6-point | Remove a checker from the highest point you occupy (e.g., the 5-point) for the 6, and move a checker for the 1. |
| 4-3 | Opponent has an anchor on your 2-point | Danger! Avoid leaving a blot on the 4 or 3-point. It's often safer to move a checker, say from the 6-point to the 2-point, to cover your blots. |
Ultimately, the bearing-off phase isn't just about removing pieces—it's the final exam of your risk management skills. One careless move can unravel an entire game's worth of solid play. By truly understanding both the mechanics and the strategy, you can navigate this critical endgame with confidence and turn a good position into a guaranteed win.
Thinking Ahead: Basic Backgammon Strategy
Once you've got the hang of how the checkers move, you’ll quickly realize backgammon is less about the luck of the dice and more about the choices you make. It's time to start playing with intent. We're going to cover some fundamental strategies that will put you miles ahead of most new players, moving you from just reacting to your rolls to playing with real foresight.
The first thing to grasp is that backgammon isn't a single type of contest; it’s a constant tug-of-war between two different game plans. While your approach might shift with every roll, most of your decisions will boil down to one of two core philosophies.
The Running Game vs. The Blocking Game
The most direct strategy is what we call the running game. Think of it as a pure footrace. Your one and only goal is to get all of your checkers around the board and into your home board faster than your opponent. This plan works best when you're already in the lead—meaning your total pip count is much lower than theirs.
But simply racing isn't always the smart move. The alternative is the blocking game, which is a more defensive, disruptive style of play. Instead of trying to outrun your opponent, you focus on controlling key points to get in their way. By building up barriers, you make it incredibly difficult for their checkers to escape and advance. It's the perfect way to slow them down, especially if you're behind in the race.
Building a Wall: The Power of Primes
The ultimate power move in a blocking game is creating a prime—a solid wall of six consecutive points that you control. Because a single checker can’t move more than six spaces with one die, a six-point prime is an unbreakable barrier. Catching an opponent's checker behind a full prime is one of the most dominant positions you can achieve.
For example, let's say your opponent has a checker stuck on your 1-point. If you manage to build a prime from your 3-point all the way to your 8-point, their checker is completely trapped. It has nowhere to go until you're forced to start breaking up your prime as you bear off. This effectively removes their checker from play for a while, giving you a huge advantage.
A key goal in any backgammon game is to establish control. Even building a three or four-point prime can severely limit your opponent's options and force them into awkward, vulnerable positions.
Controlling Key Strategic Points
Not all 30 points on the board are created equal. Some are far more valuable than others, and securing them early can define the entire game.
From the get-go, you should be aiming to make the most important points on the board. The single most valuable point to own is your 5-point. It’s the cornerstone of your home board defense and a crucial anchor for building a prime. After that, your next priorities are your 7-point (the bar point) and your 4-point. Controlling these makes it tough for your opponent to re-enter from the bar and makes it much harder for their back checkers to escape.
A Glimpse into Probability
You can't control what you roll, but you can absolutely play the odds. A little bit of probability goes a long way in making smarter, safer moves. With two dice, there are 36 possible combinations you can roll.
Knowing this helps you assess risk. For instance, the most common number to be able to move is 7, since it can be rolled as 6-1, 5-2, or 4-3. This means leaving a single checker (a "blot") seven points away from an opponent's piece is much riskier than leaving it five or nine points away. This insight helps you decide when it’s worth taking a risk and when you should play it safe.
Ready to take your game to the next level? Our detailed guide on backgammon strategy for beginners offers more advanced tips to help you secure a win. By combining these foundational strategies, you’ll move beyond just knowing the rules and start playing a truly tactical game.
Answering Common Questions from New Players
As you get your first few games under your belt, you're bound to run into some confusing situations. It happens to every new player. This section tackles the most frequent questions that pop up, giving you clear answers so you can get past those early hurdles and start playing with confidence.

What Happens If I Can't Make a Legal Move?
Sooner or later, you'll find yourself in a position where you've rolled the dice, but you're completely stuck. Every potential landing spot is blocked by your opponent. What now?
When your roll gives you no legal moves, you simply forfeit your turn. That's it. For instance, say you roll a 4-2. If you can't move any checker four spaces or two spaces without landing on a point your opponent controls (with two or more checkers), you do nothing. Your turn is over.
One crucial detail here: you must always use as much of your roll as you can. If you have a legal move for both dice, you have to take both. If you can only legally play one of the numbers, you must play the higher one if it's possible. Only when no part of the roll can be played do you lose your entire turn.
Can My Checkers Move Backwards?
This is one of the firmest rules in the game, and the answer is simple: no.
In backgammon, all movement is strictly one-way. Your checkers will always travel in a single direction around the board—from their home board, through their outer board, and finally into your home board. Once a checker moves forward, it can never retreat. This one-way street is what makes the game so strategic; it forces you to think ahead and commit to your positions.
When Is It a Good Idea to Use the Doubling Cube?
The doubling cube introduces a thrilling, high-stakes element to backgammon, but it can feel pretty intimidating at first. Honestly, for your first several games, it's a good idea to just set it aside. Focus on getting comfortable with the basics: moving, hitting, and bearing off.
As a newcomer, your main goal is to get a feel for the game's rhythm. Once you have a handle on basic strategy, then you can bring the doubling cube into play. The right time to offer a double is when you genuinely believe you have a clear advantage and are the favorite to win.
When you double, your opponent has to make a choice: accept the new, higher stakes and play on, or decline and concede the game right there, losing whatever the cube's value was before your offer.
What’s the Difference Between a Gammon and a Backgammon?
A win is a win, but some victories are far more decisive—and they’re worth more points. The game recognizes two special types of wins that go beyond a standard victory.
- Gammon (Double Win): You score a gammon if you bear off all 15 of your checkers before your opponent has managed to bear off even a single one. This impressive feat is worth double the current value of the doubling cube.
- Backgammon (Triple Win): This is the ultimate blowout. A backgammon happens when you've borne off all your checkers while your opponent not only has zero checkers off but also has at least one checker still on the bar or in your home board. This dominant victory is worth triple the value of the doubling cube.
These enhanced wins reward aggressive, skillful play and can dramatically shift the score in a multi-game match.
Can I Practice Backgammon Online?
Absolutely, and you definitely should. The explosion of digital backgammon has made it incredibly easy for beginners to learn and practice. The digital backgammon market is already valued at around $145 million and is expected to grow to $173 million by 2031, which shows just how popular it is.
Thanks to smartphones and constant internet access, millions of people can now hone their skills on an app. These platforms are fantastic for newcomers, often featuring tutorials, AI opponents that scale to your skill level, and social play. If you’ve been searching for a "backgammon for dummies" guide, these apps are the perfect tool for risk-free practice. To see what's out there, you can explore the world of digital backgammon games and their features.
At MarbleCultures, we believe a timeless game deserves to be played on a beautiful board. Our curated collection of artisanal game sets, from marble backgammon to luxury chess, is crafted to elevate your experience. Find the perfect blend of style and craftsmanship for your home or as a gift at marblecultures.com.